
Survival Fishing with Flowers
In this 1st of a 4 part series Jack from The Survival Podcast
http://thesurvivalpodcast.com
takes you survival fishing with a minimalist kit.
Jack's kit in this video consists of...
- A small assortment of snelled hooks
- A cheapo one dollar knife
- A small spool of monofilament line
- A small hank of parachute cord
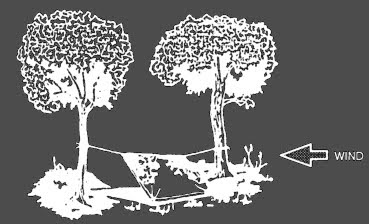
Survival Shelter Three-Pole Tarp Tepee
If you have a tarp and three poles and the situation allows, make a survival tarp tepee. It is easy and takes very little time to make this survival tepee. It provides protection from the elements and can act as a signaling device by enhancing a small amount of light from a fire or candle. It is large enough to hold several people and their equipment and to allow sleeping, cooking, and storing firewood.
You can make this tepee, you need three poles 3.5 to 4.5 meters long and about 5 centimeters in diameter.
To make this tepee (See Figure Below)--
- Lay the poles on the ground and lash them together at one end.
- Stand the framework up and spread the poles to form a tripod.
- For more support, place additional poles against the tripod. Five or six additional poles work best, but do not lash them to the tripod.
- Determine the wind direction and locate the entrance 90 degrees or more from the mean wind direction.
- Lay out the tarp on the "backside" of the tripod
- Place the tarp over the top of a free-standing pole.
- Then place the pole back up against the tripod so that the tarp is at the same height as the lashing on the three poles.
- Wrap the tarp around one side of the tripod.
- The canopy should be of double thickness, as you are wrapping an entire tarp.
- You need only wrap half of the tripod, as the remainder of the tarp will encircle the tripod in the opposite direction.
- Construct the entrance by wrapping the folded edges of the tarp around two free-standing poles.
- You can then place the poles side by side to close the tepee's entrance.
- Place all extra tarp underneath the tepee poles and inside to create a floor for the shelter.
- Leave a 30- to 50-centimeter opening at the top for ventilation if you intend to have a fire inside the tepee.

Another center support survival shelter is a Ponch Tent A-Frame set outside but over the center of the tent (Below). Use two 90- to 120-centimeter-long sticks, one with a forked end, to form the A-frame. Tie the hood's drawstring to the A-frame to support the center of the tent.

When TSHTF, one of your top concerns will be finding enough food to sustain you until regular food distribution channels get back up and running. Here's where to find the food you need:
- The food you have stored in your house.
- The food you have stored in your car and other locations (ie: bug out shelter)
- The food in your office.
- The food in other offices in your building/neighborhood/city (bring a crowbar).
- The food running around near your home (squirrel, possum, rabbits, etc).
- The wild food you can gather (berries, cat tails, apples, nuts, etc).
- The larger food in the forest (deer, elk, bear, etc).
- Larger food on local ranches (pig, goat, cow, etc).
- Food in water near your home (fish, shellfish, seaweed, etc).
- Food on local farms (vegetables, grains, fruit, etc).
- Food in grocery stores.
- Food in warehouses/cold storage warehouses.
- Food in institutions (ie: food banks, schools, hospitals, etc).
- Food in local restaurants.
- Food in vacation homes and homes where people have left.
- Food in your yard (dandelions, vegetables and fruit you have grown, etc.).
- Food on the way to its destination (shipping containers, refrigerated trucks, etc).
- Food you can create (quick growing vegies and meat supplies).
- Food provided by relief organizations.
- Food that any other day you wouldn't consider food (rats, bugs, pigeon, etc).
- Food you can have brought in (ie: a contact from an area not hit that could bring you supplies).
- Food that others may overlook (honey from bees, maple syrup from trees, snakes, etc).
- Food that takes concerted effort/materials/equipment to get (ie: whale, other deep sea fish, mountain goat, etc).
- Food that freegans would love (search dumpsters, garbage cans, garbage dumps, etc).
- Food that isn't people food (dog food, cat food, animal food stored in grain silos, etc).

Clean drinking water in 6 hours
The SODIS method is ideal for treating water for drinking in developing countries. All it requires is sunlight and PET bottles. How does it work? Clear PET bottles are filled with the water and set out in the sun for 6 hours. The UV-A rays in sunlight kill germs such as viruses, bacteria and parasites (giardia and cryptosporidia). The method also works when air and water temperatures are low.
People can use the SODIS method to treat their drinking water themselves. The method is very simple and its application is safe. It is particularly suitable for treating relatively small quantities of drinking water.
Research
Many scientific studies confirmed the effectiveness of the SODIS method. It kills germs in water very efficiently. The method has even been shown to improve the health of the population. Research into training strategies gave insight about which communication methods are most suitable. It has also been proven that the use of PET bottles in the SODIS method is harmless.
Survival Skills Make Fire with a AA battery and a staple
0 comments Posted by Bushcraft and Survival Skills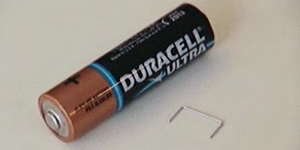
To make the poncho tent--
- Tie off the poncho hood in the same way as the poncho lean-to.
- Tie a 1.5- to 2.5-meter rope to the center grommet on each side of the poncho.
- Tie the other ends of these ropes at about knee height to two trees 2 to 3 meters apart and stretch the poncho tight.
- Draw one side of the poncho tight and secure it to the ground pushing sharpened sticks through the grommets.
- Follow the same procedure on the other side.
If you need a center support, use the same methods as for the poncho lean-to.

It takes only a short time and minimal equipment to build this lean-to (Below). You need a poncho, 2 to 3 meters of rope or parachute suspension line, three stakes about 30 centimeters long, and two trees or two poles 2 to 3 meters apart. Before selecting the trees you will use or the location of your poles, check the wind direction. Ensure that the back of your lean-to will be into the wind.
To make the lean-to--
- Tie off the hood of the poncho. Pull the drawstring tight, roll the hood longways, fold it into thirds, and tie it off with the drawstring.
- Cut the rope in half. On one long side of the poncho, tie half of the rope to the corner grommet. Tie the other half to the other corner grommet.
- Attach a drip stick (about a 10-centimeter stick) to each rope about 2.5 centimeters from the grommet. These drip sticks will keep rainwater from running down the ropes into the lean-to. Tying strings (about 10 centimeters long) to each grommet along the poncho's top edge will allow the water to run to and down the line without dripping into the shelter.
- Tie the ropes about waist high on the trees (uprights). Use a round turn and two half hitches with a quick-release knot.
- Spread the poncho and anchor it to the ground, putting sharpened sticks through the grommets and into the ground.
If you plan to use the lean-to for more than one night, or you expect rain, make a center support for the lean-to. Make this support with a line. Attach one end of the line to the poncho hood and the other end to an overhanging branch. Make sure there is no slack in the line.
Another method is to place a stick upright under the center of the lean-to. This method, however, will restrict your space and movements in the shelter.
For additional protection from wind and rain, place some brush, your rucksack, or other equipment at the sides of the lean-to.
To reduce heat loss to the ground, place some type of insulating material, such as leaves or pine needles, inside your lean-to.
Note:When at rest, you lose as much as 80 percent of your body heat to the ground.
To increase your security from enemy observation, lower the lean-to's silhouette by making two changes. First, secure the support lines to the trees at knee height (not at waist height) using two knee-high sticks in the two center grommets (sides of lean-to). Second, angle the poncho to the ground, securing it with sharpened sticks as above.
A shelter can protect you from the sun, insects, wind, rain, snow, hot or cold temperatures, and enemy observation. It can give you a feeling of well-being. It can help you maintain your will to survive.
In some areas, your need for shelter may take precedence over your need for food and possibly even your need for water. For example, prolonged exposure to cold can cause excessive fatigue and weakness (exhaustion). An exhausted person may develop a "passive" outlook, thereby losing the will to survive.
The most common error in making a shelter is to make it too large. A shelter must be large enough to protect you. It must also be small enough to contain your body heat, especially in cold climates.
SURVIVAL SHELTER SITE SELECTION
When you are in a survival situation and realize that shelter is a high priority, start looking for shelter as soon as possible. As you do so, remember what you will need at the site. Two requisites are--
- It must contain material to make the type of shelter you need.
- It must be large enough and level enough for you to lie down comfortably.
When you consider these requisites, however, you cannot ignore your tactical situation or your safety.
You must also consider whether the site--
- Provides concealment from enemy observation.
- Has camouflaged escape routes.
- Is suitable for signaling, if necessary.
- Provides protection against wild animals and rocks and dead trees that might fall.
- Is free from insects, reptiles, and poisonous plants.
You must also remember the problems that could arise in your environment. For instance--
- Avoid flash flood areas in foothills.
- Avoid avalanche or rockslide areas in mountainous terrain.
- Avoid sites near bodies of water that are below the high water mark.
In some areas, the season of the year has a strong bearing on the site you select. Ideal sites for a shelter differ in winter and summer. During cold winter months you will want a site that will protect you from the cold and wind, but will have a source of fuel and water. During summer months in the same area you will want a source of water, but you will want the site to be almost insect free.
When considering shelter site selection, use the word BLISS as a guide.
B- Blend in with the surroundings.
L- Low silhouette.
I - Irregular shape.
S- Small.
S- Secluded location.
When looking for a shelter site, keep in mind the type of shelter (protection) you need. However, you must also consider--
- How much time and effort you need to build the shelter.
- If the shelter will adequately protect you from the elements (sun, wind, rain,snow).
- If you have the tools to build it. If not, can you make improvised tools?
- If you have the type and amount of materials needed to build it.
To answer these questions, you need to know how to make various types of shelters and what materials you need to make them.
CAMP HYGIENE Keeping healthy is an important factor for survival, so strict hygiene should be practiced, not only personally but in the planning and running of a camp. Rubbish and latrines MUST BE kept away from the camp to reduce the threat from flies. Since most of the common diseases in a survival situation are water-born, pollution of drinking water MUST BE RIGOROUSLY AVOIDED. Food scraps and other rubbish should be burned in the fire if possible.
CAMP LAYOUT Select sites for all camp activities so that they do not interfere with each other or pollute the living and cooking areas. If you are camped by a river or stream, fix specific sections for activities and keep to them. Latrines should be dug downhill of the camp and away from the water supply so that there is NOpossible risk of seepage polluting either.
ACTIVITY AREAS Establish a water point from which drinking water will be collected and ensure that nobody wash, cleans pots, scrubs clothes or otherwise uses the water upstream of this point. Downstream, choose a wash point for personal bathing and clothes washing and farther downstream of that select a place to be used for cleaning cooking utensils.
LATRINES AND URINALS Latrines and rubbish disposal should be well away from the camp and preferably downwind. But not so far away that is inconvenient and people are tempted to go elsewhere. If necessary cut a track to it to make access easier.
It is important that proper latrines be established, even for the lone survivor. With a group, separate latrines for the sexes may make a mixed group feel more comfortable, and as much privacy as possible should be provided.
Even if you have it, DO NOT use disinfectant in a latrine. Lime or disinfectant would kill the USEFUL bacteria that break down waste, it will then start smelling! After using, cover the waste with earth. Add small amounts of water that will promote the bacteria. Make a latrine cover to keep out flies and REMEMBER ALWAYSto replace it, or flies may walk all over your food and start a cycle of infection. If, after a time, a latrine starts to smell, dig a new one. Fill in the old latrine. Build a new seat and burn old timbers and covers.
DEEP TRENCH LATRINE Dig a trench about 1.25m (4ft) deep and 45cm (18in) wide. Build up the sides with logs or rocks and earth to make a comfortable sitting height, sealing the gaps between them. Lay logs across to leave only a hole. Empty wood ash on the logs to make a seal. It will also deter flies. Make a lid of smaller wood to cover the opening or use a large flat rock or a large leaf weighted down with stones. ALWAYS REMEMBERto replace it.
URINAL Dig a pit about 60cm (2ft) deep. Site it close enough to the camp to ensure that people bother to use it.
RUBBISH DISPOSAL Rubbish, after checking that it really has no USEFULvalue, should be burned, and what cannot be burned should be buried. If there is too much waste for the camp fire to burn, make a separate fire in the latrine area. If a large can is available use it as an incinerator. Bury any unburned refuse in a garbage pit.
CAMP DISCIPLINE Do not prepare wild game in camp. Bleed, gut and skin downwind and downstream from camp. Keep food covered and off the ground. If kept in trees MAKE SUREit is secure from tree-dwelling animals.
Replace lids on water bottles and containers IMMEDIATELYafter using them. Stow spare clothing and equipment in your shelter. Do not leave it lying where it can get wet, soiled, or burned.
Have a place for everything and keep things tidy. Use a tree for hanging mess tins and cooking utensils. Hook them on twigs and branches, a place for mugs and spoons and keep everything off the ground.
Note:Never leave your campfire unattended.
SOAP Washing with soap removes natural oils, leaving the skin less waterproof and more prone to attack by germs. In survival circumstances it is a mistake to wash with soap too often. However, soap is the most widely used antiseptic, better than many others, such as iodine, which destroy body tissue as well as germs.
Always scrub hands before administering first-aid for wounds.
NEVER SIT ON DAMP GROUND Use something, even if it is only a log. If there is no ready-made seat available, lash together a couple of low A-frame supports and rest another branch or log across them.
CAMP BEDS A sound night's rest is worth a little toil. Time spent in making a camp bed that will keep you both comfy and warm, is time well spent.
First and foremost the right equipment. When you are cooking over a fire, there are a few things to remember. When you are able to think about these things as a system for cooking, you will automatically know what sort of pans and equipment will work on the fire.
If you sit a pan directly on the hot coals, your food will likely burn. If you hang your pan too far above the coals, it will not cook. If you try to cook over a fire instead of a bed of coals, you will be frustrated.
So what you need to work toward is a bed of hot coals, and a pan that is not too close nor too far away from the coals.
HOW close? Well, that depends on what you are cooking, and most of that knowledge will come with experience, however you can logically expect the coals to be hotter when you are closer to them :)
Obviously you will have to replenish your hot coals from time to time as you are cooking. So in your fireplace, choose a spot that is comfortable for you to reach to cook in, and another place to the side or rear of the fireplace to keep a fire going. I cook all along the front and one side of a fireplace, and allow the fire to burn in the left rear portion of the box. Whenever the coals burn out or loose some of their heat, scoop hot coals from the fire area to the cooking area. Some of the spent coals can be removed during cooking, but I usually wait 'until the cooking is over to do that.
There are many, many items that you could purchase to use for cooking in your fireplace, but here are my favorites:
Spiders These are three or four legged trivet-like things that hold your pans above the coals. They have a ring for the pan to sit in and an open bottom. They can be purchased in varying heights so that you can cook close to the coals or several inches away from them. Three different heights would be ideal, but two would do. The really tall ones are great for keeping food warm.
If you equip your fireplace with a trammel or hanging arm, you can buy all kinds of do-dads to hang on it and hang your pots from. I like the one that adjusts from short to long so you can adjust how quickly your food is cooking without moving the pot off the fire. This is especially handy if your fireplace is small and you are cramped for room in there.
Utensils - Well, obviously you want long ones....but don't get them any longer than what is comfortable for you to manage. My very longest ones are 18". Also consider getting cast iron utensils instead of stainless or wooden ones. They just last longer. You need a spoon, a slotted spoon, a fork or three of various sizes, two spatulas, one short and one long, and that's all that is really essential. As you cook more and more you will find that there are other utensils that you would like to have. Choose very sturdy ones, for you will find that you use them for lifting Dutch Oven lids, pots and pans and other heavy items out of the fire. I finally got a utensil that is nothing more than a big hook to do just that!
You might want a spit to roast meat on, but I bind the meat up with cotton thread, season it and hang over slow coals for about 6-8 hours to roast. Works well, if you can stand the aroma for that long! Another good way to roast meat like venison steaks, is to skewer the meat onto a large fork and prop the fork up in front of the fire, turning frequently 'until the meat is done.
There are reflector ovens made for the fireplace and they are really great.....once you learn how to use them properly, and that takes practice. They can be used to cook meats, breads, cakes, cookies, or casseroles. They are relatively slow cooking, but they do the job very well, as soon as you learn how to keep the coals at an even temperature and how to pull the oven back from the fire when it becomes too hot.
There are also Dutch Ovens. I recommend one with a lid that has a lip on it so that you can put hot coals on top of it without them sliding off. The coals on the top of the lid helps the food to cook from both the top and bottom of the pan, much the way a conventional oven does. This is the best way to bake in the fireplace, besides the reflector oven. You want Dutch Ovens that have LEGS. You will need at a minimum of three Dutch Ovens to cook a large meal. They can be used to cook cakes, cornbread, puddings, soups, stews, roasts, on and on.....The trick is to keep the pan moving every ____ minutes. You will fill in the blank as you are more experienced, but I find that I like to move my Dutch Oven around and reposition it with new coals every 5-15 minutes. It's very easy to burn a cake in a Dutch Oven...How do I know? Oh....never mind.
Pots and Pans - Well, just get cast iron and make sure that they all have LEGS on them! You want the coals to be able to get up under the pans to cook the food, this way you don't have to sit the pan ON the coals and risk burning. Make sure they have handles, too.
You will need a safe place to sit hot pans coming off the fire, lots of dish towels and all of the usual fireplace accouterments like a shovel, ash bucket, bucket of water for emergencies, poker.
You will need a large pan or tray to place your utensils on while you are using them.
One last thing I have learned about cooking over a fire. When I am pushed for time and I have hungry people to cook for I have to use higher heat and therefore more grease in my cooking. However, if you are not pressed for time and you can relax a bit, you can cook with lower temperature coals and use less grease. This may not seem important now, but as you cook on the fire more and more you will catch yourself adding more grease to whatever you are cooking because the temp. is too high.
You are going to have to grease the pans a lot more than you are probably used to doing anyway with conventional cooking, especially considering our low fat ways these days. But as you become more experienced, you can cut back on the grease considerably.
Oh, and most importantly, take your time when you can, don't stress out when you're over the fire, and don't cook with little ones all around you.
 Subscribe