
in this vid you can see how i make fire with a clear plastic (PET) water bottle - the kind that you find everywhere (unfortunately... :( ).
i used charred cloth, horseshoe fungus and almost-dry cow dung to get an ember (you can use other natural tinder, too) and some jute twine to get a flame (you can use dry grass, tree bark fibers, dry leafs etc.).
i want to thank to my friend radu (aka m00thman) who gave me the ideea for this vid.
Tags: * bushcraft * bushcraft skills * firemaking * how to make fire * fire * tinder * start a fire * water bottle * plactic bottle * soda bottle * outdoor * outdoorsman * camping * survival * cooking
Are you ready to bug out in cold weather? What gear would you need? How would you stay clean?
I thought I was ready until I actually tried winter camping for ten days. I had a lot to learn, the hard, cold way.
Sot and I arrived on Sunday and were stoked to get on the trail to find a place to set up camp. The snow wasn't deep enough to need snowshoes, which also meant we wouldn't be making any snow shelters like a quinzee or snow cave.
After some scouting we found an open area ideal for setting up the 11 foot diameter tipi and outside fire pit. The hike in only took about 15 minutes with our over packed sleds, and we're both sadly out of shape. Each sled was loaded with about 60 pounds of gear.
After we caught our breath we started to set up. The woodstove and teepee didn't take long, and within a couple of hours we had a working campsite complete with an outside firepit and lean-to.
We froze for the first three nights as I just couldn't get the stove in the tepee to work. Even with our mountains of wool blankets. In fact, we spent much of the first three nights hanging out in the truck with the heater on waiting for the sun to rise so we could drive to town and have a hot breakfast.
Sot had enough of the cold, hard living by Thursday, so I drove him home. While driving him home I got more supplies and the keys for my friend's cabin that's on the land we were camping on.
I thought it would be great to recover with some easier living in the cabin but I was in for a rude awakening. Since the cabin was in the middle of being renovated there was no source of heat and the walls and floors had many small holes that made it just as cold inside as outside.
There was a propane stove, a bed and level floors though, so it was easier in some ways than living in the great outdoors. It took me a couple of hours to make the mental shift from camper to squatter, but I eventually got the hang of it.
My heart goes out to homeless people, especially in cold climates. I was lucky to have an escape plan from my ten day experiment and still I found it challenging.
- mice
- bed blankets
- hygiene-cleaning, pee, poo
- cooking
- tools
- water
- always cold, parka on
Tags: cold weather camping squatting survival extreme surviving survivalist survivalism survived zombie teotwawki emergency preparedness prepper tactical evasion sar training special forces military army ranger camp backpack equipment tipi teepee tepee tarp sled toboggan pulk knife howto how to snowshoe snow shoe fire making shelter bush craft bushcraft axe wood stove urban woodstove mukluk primitive wilderness outdoors review wool blanket weapon search rescue
a day out into the woods after some serious rain, presenting the swedish torch - my way: you don't need to cut and split big logs, and you can do it with your sak saw (although i preffer my fiskars). i cheated a bit, using a mini-bushbuddy burner (made from a tea candle) to light the torch.
Survival Training Notes
The following are excerpts from notes on survival training that was used while an instructor at the Special Forces School (1983-1985) where he was fortunate enough to serve under LTC James N. (Nick) Rowe, and the US Army Ranger School (1986-1988). They reflect his opinions and understandings of survival techniques and in no way should they be accepted as "gospel." If you have a need or interest in wilderness survival, I suggest you research the subject by reading any of the many excellent sources on the market to include: FM 21-76: Survival, The Boy Scout Handbook, Outdoor Survival Skills by Larry Dean Olsen, Bushcraft by Richard Graves, or Bernard Shanks' Wilderness Survival.
by Carl J. Archer MAJOR (USAR), Special Forces
The key word "SURVIVAL" is an acronym to be used as an "immediate action drill" to be performed at the outset of a wilderness survival situation. Use this simple phrase to plan measures that will assist you in surviving in the wilderness and returning to civilization. The Key Word "SURVIVAL" will provide you with two of the most important survival skills--the ability to organize yourself and the ability to stay calm.
A. "S" stands for "Size up the situation."
(1) Consider your physical condition and perform any first aid required.
(2) Concentrate your senses on getting a feel for the area.
(3) Conduct an inventory of the equipment you have.
(4) Begin planning.
B. "U" stands for "Undue haste makes waste."
(1) Reacting without thinking or planning can result in faulty decisions and could result in your death.
(2) Acting in haste, just for the sake of action, will make you careless. The natural tendency in a stressful situation is to run. You must overcome this tendency and think of your objectives.
(3) If you act in haste, you may lose or forget equipment, you may not make a survival plan, and you may become disoriented and not know your location. As a cultural group. Americans have little patience. Know this weakness if it is your own particular Achilles' heel.
C. "R" stands for "Remember where you are."
(1) Always knowing where you are on the map and how it relates to the surrounding terrain is a principle no outdoorsman should violate.
(2) If in a group, always know the location of the maps and compasses.
(3) Guard against the natural tendency of allowing someone else to be responsible for navigation. Always be aware of your route, regardless of the mode of travel.
(4) Whether you are in a base camp or on the move, you should always know the following things:
(a) Direction or location of the nearest populated area.
(b) Direction or location to the nearest major transportation artery (river, highway, railroad track, etc.)
(c) Location of local water sources.
D. "V" stands for "Vanquish fear and panic."
(1) Fear and panic are two of the greatest enemies in a survival situation. These are not unusual emotions. The secret is to recognize them and control them.
(2) Fear, panic, and anxiety take their toll on the body. They divert needed energy.
(3) Many people have never been alone and without diversion. This could subject them to anxiety.
(4) The best way to control fear in a survival situation is preparation, prior planning, and training.
E. "I" stands for "Improvise."
(1) Make the wrong tool and do the right job.
(2) Make an object do more than one job.
F. "V" stands for "Value living."
(1) A man's will to survive, to endure, to live, is the key to survival. Maintaining a positive mental outlook and a desire to live will allow an individual to overcome tremendous odds.
G. "A" stands for "Act like the natives."
(1) Many situations we would consider to be "survival situations" are dealt with on a daily basis by primitive peoples all over the world. To them, these situations are a way of life and hold no specific danger. Read about these people and our own ancestors. They survived in a world without electricity, stores, or fast food; you can too.
H. "L" stands for "Learn basic skills."
(1) Learn to put together a survival kit that will meet your specific needs and probable survival situations. Learn to use your survival kit.
(2) Learn to make fire in different environments with different materials.
(3) Learn to build shelter from natural materials.
(4) Learn to find and purify water.
(5) Learn first aid and the treatment of most common survival dangers such as insect stings, snake bites, climatic injuries, etc.
(6) Concentrate on "doing" as opposed to "knowing". Many people know how to build a fire, but cannot build a fire in a rain storm with damp tinder. That is the fine line between surviving or dying.
The physiological and psychological aspects of survival and their significance on an individual in a wilderness survival situation is very subjective. Know your mental, emotional, and physical limitations and prepare for their impact on your ability to survive.
A. Fear is a normal reaction to a threatening situation. Acceptance of this fear will lead to purposeful rather than random behavior. This way will greatly increase chances for survival.
B. How a person will react to fear depends more on himself than on the situation. Timid and anxious persons may respond more coolly to fear than the physically strong or happy-go-lucky.
C. Two factors frequently reported to decrease or help control fear are:
(1) Having confidence in your abilities and your equipment.
(2) Concentrating on the situation at hand and the job to be done.
D. The seven "enemies" of survival are pain, cold, thirst, hunger, fatigue, boredom, and loneliness. They are mental distractions and difficult to overcome.
(1) Pain is uncomfortable but in itself is not harmful or dangerous. It is a symptom of underlying problems and should be monitored. It can be controlled and can become subordinate to efforts to carry on.
(2) Cold numbs the mind, the body, and the will.
(3) Thirst dulls the mind. Serious dehydration may occur in a survival situation even when there is plenty of water available.
(4) Hunger lessens your ability to think rationally.
(5) Even a moderate amount of fatigue can materially reduce mental ability. Fatigue can make you careless and promote the feeling of hopelessness.
(6) Boredom and loneliness are two of the toughest enemies of survival to overcome.
E. Everyone has experienced pain, cold, thirst, hunger, fatigue, boredom, and loneliness, but not to the extent that their survival has been threatened. The more you know about these and their effects on you, the better you will be able to control them, rather than letting them control you.
F. One of the most important psychological requirements for survival is the ability to accept immediately the reality of a new emergency and react appropriately to it.
G. Much of the available evidence demonstrates the importance of having a "preparatory attitude" for whatever emergency may occur. Knowledge and rehearsal of survival and emergency procedures bring about a feeling of confidence and preparation for survival. While you can't prepare for every situation, you can prepare for the most probable situation.
H. Survival may depend more on personality than upon danger, weather, terrain, or nature of the emergency. A person is more prone to survive if he can make up his mind; can improvise; can live with himself,; can adapt to the situation; can remain cool, calm, and collected; hopes for the best, but prepares for the worst; has patience; can take it; and knows where his special fears and worries comes from. The will to survive, along with a positive mental attitude, are key ingredients to surviving.
I. In summary, development of self-sufficiency is the primary means of protecting yourself against the physiological and psychological stress that could affect you in a survival situation. If you have not learned self- sufficiency, it is not too late to begin.
Preparedness for a survival situation is the cornerstone of success. You should build a personal survival kit based on your own needs and the probable situations you will encounter. This kit should be carried whenever you could be placed in a wilderness survival situation.
A. Survival planning begins with realizing that you may be placed into a survival situation at any time. Realizing this, you must take steps to enhance your ability to survive. Be aware of your environment, whether you are entering a strange building or leaving your camp for a short hike.
B. A person's ability to survive cannot be fully judged prior to actually being involved in a survival situation. Training, practice, and preparation may mean the difference between life and death.
C. Become familiar with the contents of any survival kit you have access to. Practice using the contents of your personal survival kit under differing conditions.
D. Carry some forms of survival kit with you at all times. This could range from spare cash on a trip to the city; extra identification, credit cards, and medicine on a trip overseas; or a wilderness survival kit that you carry on a backpacking trip.
E. Before constructing a survival kit, consider your skills, the environment you are working in, and where the kit will be carried.
F. When selecting items for your kit, avoid redundancy and look for items that will perform more than one function. Build flexibility into your kit.
G. The container for your kit should be water repellent, accept components of varying shapes and sizes, and be durable. Your kit should be small enough to fit comfortably in a pocket. A survival kit doesn't do any good if you don't carry it.
H. As a minimum, your wilderness survival kit should allow you to make a fire, build shelter, and purify/carry water. Also consider first aid, signaling, and food procurement.
I. Do not delay the completion of a survival kit to support you in various situations. Do not buy "high speed" components. Concentrate on sturdy, inexpensive components that will perform the required functions.
J. Maintain a survival log in a survival situation. Entries into the log should be clear and concise. They should explain who you are, how you got into a survival situation, and an inventory of your equipment. Further entries should include your activities, what you eat/drink, amount/description of urine/feces, and physical/mental state.
K. Draw a map of the local area. Include a legend, north arrow, location of your shelter, water sources, game trails, your traps and snares, major terrain features, roads, latrine area, and an alternate camp site.
Fire building is one of the three critical factors in a wilderness survival situation. A fire can improve your mental well-being, keep you warm, purify water by boiling, be used as a signal, and cook your food.
A. Selection of a site takes into consideration the possibility of grass or forest fires, wet or flooded ground, rain, and snow.
B. Heat, fuel, and oxygen are needed to build a fire.
C. Heat can be obtained by matches, lighter, magnifying glass, friction, battery, or the discharge of a weapon.
D. Fuel falls into three categories:
(1) Tinder ignites with a minimum of heat. Examples of tinder are birch bark, wood shavings, dry straw/grass, sawdust, waxed paper, bird down, hemp rope/twine, a candle, cloth squares dipped in paraffin/wax, or gasoline mixed with dirt.
(2) Kindling is readily combustible fuel that is added to tinder once sufficient flame is obtained. Examples of kindling are small twigs, cardboard, and split wood.
(3) Sustaining fuel is added to maintain the fire once it is started. Examples of sustaining fuel include deadwood, logs, and split green wood.
E. Holly and fir should not be used for fire building since they can explode.
F. To build a fire, place a small amount of tinder on a clear dry surface; ignite the lower windward side of the tinder; slowly add kindling after the tinder has ignited; slowly add sustaining fuel after the kindling has ignited. Build your fire "loosely" to ensure oxygen can circulate around the fuel.
Exposure to the elements is the biggest killer of people in a survival situation. The ability to shelter yourself from the extremes of the elements will go a long way to improve your chances of survival. Shelter can be portable and carried as part of your kit or built from natural material.
A. In selecting a site for a field shelter, consider what the shelter will protect you from. Ideal sites in winter and summer will differ. Select a winter site near fuel and water that will offer protection from the wind. In summer, choose a site that will protect you from rain, sun, and insects. Evaluate your environment.
(1) In coastal areas, consider high tide levels.
(2) In foothills, avoid flash flood (low) areas.
(3) In mountainous areas, avoid potential avalanche sites.
(4) In all areas, choose a site that is well drained.
B. Ponchos and tarps can be used to construct quick, effective, temporary shelters. Using a poncho or tarp, you can construct a lean-to, pup tent, hammock, or envelope.
C. A timber lean-to is similar to a poncho or tarp lean-to, but it is made from locally procured, natural materials (brush, pine needles, etc.).
D. When building a shelter in snow, insulation from the ground is extremely important.
E. A simple, effective dessert/beach shelter can be made by digging a man sized hole approximately 18 inches deep in the sand and covering it with two layers of shade producing material (poncho, tarp, etc.). There should be an air space of approximately six inches between the shade layers.
The ability to procure and purify water in a survival environment is one of the most critical and difficult tasks to accomplish. Dehydration is second only to exposure as a killer in survival situations. Many survival manuals and kits emphasize food procurement, but water procurement is much more crucial. A person can go weeks without food but only several days without water.
A. Seawater, blood, urine, or alcohol should not be used as a substitute for water. Your body will expend more fluid purifying them than it will derive from them.
B. Snow and ice are an excellent source of water but must be melted prior to use.
C. Rainwater or dew may be collected in waterproof material such as a poncho or tarp. It may be soaked up in cloth and wrung out. Shallow wells may be dug to collect rainfall and run-off. Water may be obtained from hollow trees, puddles, crevices, and leaves.
D. Water may be condensed from the steam of boiling seawater.
E. The basic water still will provide water in almost any environment. The water still can be in ground (a sheet of plastic, weighted in the center, spread over a hole in the ground, with a collection vessel underneath), above ground (a plastic bag filled with non-poisonous green vegetation and placed in the sun), or a transportation still (a plastic bag, tied over the end of a living, non-poisonous plant or tree branch). The in ground still is the best expedient way to purify water in a contaminated environment.
F. Muddy, stagnant, or polluted water should be made clear by filtration through layers of sand, gravel, and charcoal; or by settling prior to purification.
G. Water must be purified by boiling for 5-10 minutes; adding purification tablets per package instructions; adding 5-10 drops of 2% tincture of iodine per quart of water (let stand for 30 minutes); adding 5-10 drops of chlorine bleach per quart of water (let stand for 30 minutes); or using a portable purifier available commercially.
Survival Skills Starting a Fire in Wet Conditions
2 comments Posted by Bushcraft and Survival SkillsSurvival Skills Starting a Fire in Wet Conditions
Making and maintaining a fire in wet conditions can be challenging unless you have the right skills The first thing you need to do is gather the required materials, that is tinder, kindling and fuel. However if it is wet or raining or even with snow on the ground, it can be a bit more difficult, but not impossible, if you know where to look.
Some things to look for and consider:
- Standing dead fall
- Hanging dead fall
- Tree bark
- Inside of mature milkweed pods
- Pine pitch or pine resin
- Underneath rock shelves
- Underneath downed trees or logs or even inside of them
- Inside of thick shrubs or sedges
- Underneath heavy snow pack if the temps are below freezing
- Heavy patches of dead weeds or tall grasses
- Inside or arround old animal burrows, just be cautious with this one make sure the owner is not at home!
- One stick fire method
Another consideration maybe on your person, a piece of your clothing, or even something from your wallet. And yes that does include the paper cash you might have as well, if your in a survival situation then you had better really consider it. It is far better to loose a few pieces of paper money then to loose your life don't you think?
If you are not completely drenched you might be able to find lint in the very bottom corners of your pockets. Dry lint will ignite very easily as long as you have acquired enough to use as tinder.
In wet conditions it is best to build your fire on top of something and if possible underneath some type of refuge. Before creating your fire clear an area, look for a foundation to start it on, a flat piece of wood, metal, debris or a rock. Make use of what ever is in the area to keep the rain or snow off your fire until it gets hot enough to sustain itself.
In wet conditions you will have a very difficult time finding dry natural tinder, this is the very reason why Survivalists and Bushcrafters carry many different types of tinder in their survival and bushcraft kits and practice many different methods of Firecraft.
Here is a very good 2 part playlist demonstrating many of the topics discussed here.
Wilderness Survival Shelter Fire Water Hypothermia
0 comments Posted by Bushcraft and Survival SkillsPaul teaches on how to build a shelter, start a fire, melt snow, and signs of hypothermia. Shelter built with only a knife and fire started with a flint.
Survival Skills Make Fire with a AA battery and a staple
0 comments Posted by Bushcraft and Survival Skills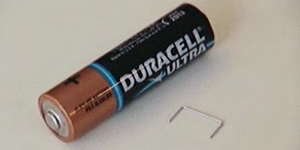
First and foremost the right equipment. When you are cooking over a fire, there are a few things to remember. When you are able to think about these things as a system for cooking, you will automatically know what sort of pans and equipment will work on the fire.
If you sit a pan directly on the hot coals, your food will likely burn. If you hang your pan too far above the coals, it will not cook. If you try to cook over a fire instead of a bed of coals, you will be frustrated.
So what you need to work toward is a bed of hot coals, and a pan that is not too close nor too far away from the coals.
HOW close? Well, that depends on what you are cooking, and most of that knowledge will come with experience, however you can logically expect the coals to be hotter when you are closer to them :)
Obviously you will have to replenish your hot coals from time to time as you are cooking. So in your fireplace, choose a spot that is comfortable for you to reach to cook in, and another place to the side or rear of the fireplace to keep a fire going. I cook all along the front and one side of a fireplace, and allow the fire to burn in the left rear portion of the box. Whenever the coals burn out or loose some of their heat, scoop hot coals from the fire area to the cooking area. Some of the spent coals can be removed during cooking, but I usually wait 'until the cooking is over to do that.
There are many, many items that you could purchase to use for cooking in your fireplace, but here are my favorites:
Spiders These are three or four legged trivet-like things that hold your pans above the coals. They have a ring for the pan to sit in and an open bottom. They can be purchased in varying heights so that you can cook close to the coals or several inches away from them. Three different heights would be ideal, but two would do. The really tall ones are great for keeping food warm.
If you equip your fireplace with a trammel or hanging arm, you can buy all kinds of do-dads to hang on it and hang your pots from. I like the one that adjusts from short to long so you can adjust how quickly your food is cooking without moving the pot off the fire. This is especially handy if your fireplace is small and you are cramped for room in there.
Utensils - Well, obviously you want long ones....but don't get them any longer than what is comfortable for you to manage. My very longest ones are 18". Also consider getting cast iron utensils instead of stainless or wooden ones. They just last longer. You need a spoon, a slotted spoon, a fork or three of various sizes, two spatulas, one short and one long, and that's all that is really essential. As you cook more and more you will find that there are other utensils that you would like to have. Choose very sturdy ones, for you will find that you use them for lifting Dutch Oven lids, pots and pans and other heavy items out of the fire. I finally got a utensil that is nothing more than a big hook to do just that!
You might want a spit to roast meat on, but I bind the meat up with cotton thread, season it and hang over slow coals for about 6-8 hours to roast. Works well, if you can stand the aroma for that long! Another good way to roast meat like venison steaks, is to skewer the meat onto a large fork and prop the fork up in front of the fire, turning frequently 'until the meat is done.
There are reflector ovens made for the fireplace and they are really great.....once you learn how to use them properly, and that takes practice. They can be used to cook meats, breads, cakes, cookies, or casseroles. They are relatively slow cooking, but they do the job very well, as soon as you learn how to keep the coals at an even temperature and how to pull the oven back from the fire when it becomes too hot.
There are also Dutch Ovens. I recommend one with a lid that has a lip on it so that you can put hot coals on top of it without them sliding off. The coals on the top of the lid helps the food to cook from both the top and bottom of the pan, much the way a conventional oven does. This is the best way to bake in the fireplace, besides the reflector oven. You want Dutch Ovens that have LEGS. You will need at a minimum of three Dutch Ovens to cook a large meal. They can be used to cook cakes, cornbread, puddings, soups, stews, roasts, on and on.....The trick is to keep the pan moving every ____ minutes. You will fill in the blank as you are more experienced, but I find that I like to move my Dutch Oven around and reposition it with new coals every 5-15 minutes. It's very easy to burn a cake in a Dutch Oven...How do I know? Oh....never mind.
Pots and Pans - Well, just get cast iron and make sure that they all have LEGS on them! You want the coals to be able to get up under the pans to cook the food, this way you don't have to sit the pan ON the coals and risk burning. Make sure they have handles, too.
You will need a safe place to sit hot pans coming off the fire, lots of dish towels and all of the usual fireplace accouterments like a shovel, ash bucket, bucket of water for emergencies, poker.
You will need a large pan or tray to place your utensils on while you are using them.
One last thing I have learned about cooking over a fire. When I am pushed for time and I have hungry people to cook for I have to use higher heat and therefore more grease in my cooking. However, if you are not pressed for time and you can relax a bit, you can cook with lower temperature coals and use less grease. This may not seem important now, but as you cook on the fire more and more you will catch yourself adding more grease to whatever you are cooking because the temp. is too high.
You are going to have to grease the pans a lot more than you are probably used to doing anyway with conventional cooking, especially considering our low fat ways these days. But as you become more experienced, you can cut back on the grease considerably.
Oh, and most importantly, take your time when you can, don't stress out when you're over the fire, and don't cook with little ones all around you.
Items for use as tinder (must be completely dry)
- Birch Bark
- Shredded inner bark from
 Subscribe