
Survival Training Notes
The following are excerpts from notes on survival training that was used while an instructor at the Special Forces School (1983-1985) where he was fortunate enough to serve under LTC James N. (Nick) Rowe, and the US Army Ranger School (1986-1988). They reflect his opinions and understandings of survival techniques and in no way should they be accepted as "gospel." If you have a need or interest in wilderness survival, I suggest you research the subject by reading any of the many excellent sources on the market to include: FM 21-76: Survival, The Boy Scout Handbook, Outdoor Survival Skills by Larry Dean Olsen, Bushcraft by Richard Graves, or Bernard Shanks' Wilderness Survival.
by Carl J. Archer MAJOR (USAR), Special Forces
The key word "SURVIVAL" is an acronym to be used as an "immediate action drill" to be performed at the outset of a wilderness survival situation. Use this simple phrase to plan measures that will assist you in surviving in the wilderness and returning to civilization. The Key Word "SURVIVAL" will provide you with two of the most important survival skills--the ability to organize yourself and the ability to stay calm.
A. "S" stands for "Size up the situation."
(1) Consider your physical condition and perform any first aid required.
(2) Concentrate your senses on getting a feel for the area.
(3) Conduct an inventory of the equipment you have.
(4) Begin planning.
B. "U" stands for "Undue haste makes waste."
(1) Reacting without thinking or planning can result in faulty decisions and could result in your death.
(2) Acting in haste, just for the sake of action, will make you careless. The natural tendency in a stressful situation is to run. You must overcome this tendency and think of your objectives.
(3) If you act in haste, you may lose or forget equipment, you may not make a survival plan, and you may become disoriented and not know your location. As a cultural group. Americans have little patience. Know this weakness if it is your own particular Achilles' heel.
C. "R" stands for "Remember where you are."
(1) Always knowing where you are on the map and how it relates to the surrounding terrain is a principle no outdoorsman should violate.
(2) If in a group, always know the location of the maps and compasses.
(3) Guard against the natural tendency of allowing someone else to be responsible for navigation. Always be aware of your route, regardless of the mode of travel.
(4) Whether you are in a base camp or on the move, you should always know the following things:
(a) Direction or location of the nearest populated area.
(b) Direction or location to the nearest major transportation artery (river, highway, railroad track, etc.)
(c) Location of local water sources.
D. "V" stands for "Vanquish fear and panic."
(1) Fear and panic are two of the greatest enemies in a survival situation. These are not unusual emotions. The secret is to recognize them and control them.
(2) Fear, panic, and anxiety take their toll on the body. They divert needed energy.
(3) Many people have never been alone and without diversion. This could subject them to anxiety.
(4) The best way to control fear in a survival situation is preparation, prior planning, and training.
E. "I" stands for "Improvise."
(1) Make the wrong tool and do the right job.
(2) Make an object do more than one job.
F. "V" stands for "Value living."
(1) A man's will to survive, to endure, to live, is the key to survival. Maintaining a positive mental outlook and a desire to live will allow an individual to overcome tremendous odds.
G. "A" stands for "Act like the natives."
(1) Many situations we would consider to be "survival situations" are dealt with on a daily basis by primitive peoples all over the world. To them, these situations are a way of life and hold no specific danger. Read about these people and our own ancestors. They survived in a world without electricity, stores, or fast food; you can too.
H. "L" stands for "Learn basic skills."
(1) Learn to put together a survival kit that will meet your specific needs and probable survival situations. Learn to use your survival kit.
(2) Learn to make fire in different environments with different materials.
(3) Learn to build shelter from natural materials.
(4) Learn to find and purify water.
(5) Learn first aid and the treatment of most common survival dangers such as insect stings, snake bites, climatic injuries, etc.
(6) Concentrate on "doing" as opposed to "knowing". Many people know how to build a fire, but cannot build a fire in a rain storm with damp tinder. That is the fine line between surviving or dying.
The physiological and psychological aspects of survival and their significance on an individual in a wilderness survival situation is very subjective. Know your mental, emotional, and physical limitations and prepare for their impact on your ability to survive.
A. Fear is a normal reaction to a threatening situation. Acceptance of this fear will lead to purposeful rather than random behavior. This way will greatly increase chances for survival.
B. How a person will react to fear depends more on himself than on the situation. Timid and anxious persons may respond more coolly to fear than the physically strong or happy-go-lucky.
C. Two factors frequently reported to decrease or help control fear are:
(1) Having confidence in your abilities and your equipment.
(2) Concentrating on the situation at hand and the job to be done.
D. The seven "enemies" of survival are pain, cold, thirst, hunger, fatigue, boredom, and loneliness. They are mental distractions and difficult to overcome.
(1) Pain is uncomfortable but in itself is not harmful or dangerous. It is a symptom of underlying problems and should be monitored. It can be controlled and can become subordinate to efforts to carry on.
(2) Cold numbs the mind, the body, and the will.
(3) Thirst dulls the mind. Serious dehydration may occur in a survival situation even when there is plenty of water available.
(4) Hunger lessens your ability to think rationally.
(5) Even a moderate amount of fatigue can materially reduce mental ability. Fatigue can make you careless and promote the feeling of hopelessness.
(6) Boredom and loneliness are two of the toughest enemies of survival to overcome.
E. Everyone has experienced pain, cold, thirst, hunger, fatigue, boredom, and loneliness, but not to the extent that their survival has been threatened. The more you know about these and their effects on you, the better you will be able to control them, rather than letting them control you.
F. One of the most important psychological requirements for survival is the ability to accept immediately the reality of a new emergency and react appropriately to it.
G. Much of the available evidence demonstrates the importance of having a "preparatory attitude" for whatever emergency may occur. Knowledge and rehearsal of survival and emergency procedures bring about a feeling of confidence and preparation for survival. While you can't prepare for every situation, you can prepare for the most probable situation.
H. Survival may depend more on personality than upon danger, weather, terrain, or nature of the emergency. A person is more prone to survive if he can make up his mind; can improvise; can live with himself,; can adapt to the situation; can remain cool, calm, and collected; hopes for the best, but prepares for the worst; has patience; can take it; and knows where his special fears and worries comes from. The will to survive, along with a positive mental attitude, are key ingredients to surviving.
I. In summary, development of self-sufficiency is the primary means of protecting yourself against the physiological and psychological stress that could affect you in a survival situation. If you have not learned self- sufficiency, it is not too late to begin.
Preparedness for a survival situation is the cornerstone of success. You should build a personal survival kit based on your own needs and the probable situations you will encounter. This kit should be carried whenever you could be placed in a wilderness survival situation.
A. Survival planning begins with realizing that you may be placed into a survival situation at any time. Realizing this, you must take steps to enhance your ability to survive. Be aware of your environment, whether you are entering a strange building or leaving your camp for a short hike.
B. A person's ability to survive cannot be fully judged prior to actually being involved in a survival situation. Training, practice, and preparation may mean the difference between life and death.
C. Become familiar with the contents of any survival kit you have access to. Practice using the contents of your personal survival kit under differing conditions.
D. Carry some forms of survival kit with you at all times. This could range from spare cash on a trip to the city; extra identification, credit cards, and medicine on a trip overseas; or a wilderness survival kit that you carry on a backpacking trip.
E. Before constructing a survival kit, consider your skills, the environment you are working in, and where the kit will be carried.
F. When selecting items for your kit, avoid redundancy and look for items that will perform more than one function. Build flexibility into your kit.
G. The container for your kit should be water repellent, accept components of varying shapes and sizes, and be durable. Your kit should be small enough to fit comfortably in a pocket. A survival kit doesn't do any good if you don't carry it.
H. As a minimum, your wilderness survival kit should allow you to make a fire, build shelter, and purify/carry water. Also consider first aid, signaling, and food procurement.
I. Do not delay the completion of a survival kit to support you in various situations. Do not buy "high speed" components. Concentrate on sturdy, inexpensive components that will perform the required functions.
J. Maintain a survival log in a survival situation. Entries into the log should be clear and concise. They should explain who you are, how you got into a survival situation, and an inventory of your equipment. Further entries should include your activities, what you eat/drink, amount/description of urine/feces, and physical/mental state.
K. Draw a map of the local area. Include a legend, north arrow, location of your shelter, water sources, game trails, your traps and snares, major terrain features, roads, latrine area, and an alternate camp site.
Fire building is one of the three critical factors in a wilderness survival situation. A fire can improve your mental well-being, keep you warm, purify water by boiling, be used as a signal, and cook your food.
A. Selection of a site takes into consideration the possibility of grass or forest fires, wet or flooded ground, rain, and snow.
B. Heat, fuel, and oxygen are needed to build a fire.
C. Heat can be obtained by matches, lighter, magnifying glass, friction, battery, or the discharge of a weapon.
D. Fuel falls into three categories:
(1) Tinder ignites with a minimum of heat. Examples of tinder are birch bark, wood shavings, dry straw/grass, sawdust, waxed paper, bird down, hemp rope/twine, a candle, cloth squares dipped in paraffin/wax, or gasoline mixed with dirt.
(2) Kindling is readily combustible fuel that is added to tinder once sufficient flame is obtained. Examples of kindling are small twigs, cardboard, and split wood.
(3) Sustaining fuel is added to maintain the fire once it is started. Examples of sustaining fuel include deadwood, logs, and split green wood.
E. Holly and fir should not be used for fire building since they can explode.
F. To build a fire, place a small amount of tinder on a clear dry surface; ignite the lower windward side of the tinder; slowly add kindling after the tinder has ignited; slowly add sustaining fuel after the kindling has ignited. Build your fire "loosely" to ensure oxygen can circulate around the fuel.
Exposure to the elements is the biggest killer of people in a survival situation. The ability to shelter yourself from the extremes of the elements will go a long way to improve your chances of survival. Shelter can be portable and carried as part of your kit or built from natural material.
A. In selecting a site for a field shelter, consider what the shelter will protect you from. Ideal sites in winter and summer will differ. Select a winter site near fuel and water that will offer protection from the wind. In summer, choose a site that will protect you from rain, sun, and insects. Evaluate your environment.
(1) In coastal areas, consider high tide levels.
(2) In foothills, avoid flash flood (low) areas.
(3) In mountainous areas, avoid potential avalanche sites.
(4) In all areas, choose a site that is well drained.
B. Ponchos and tarps can be used to construct quick, effective, temporary shelters. Using a poncho or tarp, you can construct a lean-to, pup tent, hammock, or envelope.
C. A timber lean-to is similar to a poncho or tarp lean-to, but it is made from locally procured, natural materials (brush, pine needles, etc.).
D. When building a shelter in snow, insulation from the ground is extremely important.
E. A simple, effective dessert/beach shelter can be made by digging a man sized hole approximately 18 inches deep in the sand and covering it with two layers of shade producing material (poncho, tarp, etc.). There should be an air space of approximately six inches between the shade layers.
The ability to procure and purify water in a survival environment is one of the most critical and difficult tasks to accomplish. Dehydration is second only to exposure as a killer in survival situations. Many survival manuals and kits emphasize food procurement, but water procurement is much more crucial. A person can go weeks without food but only several days without water.
A. Seawater, blood, urine, or alcohol should not be used as a substitute for water. Your body will expend more fluid purifying them than it will derive from them.
B. Snow and ice are an excellent source of water but must be melted prior to use.
C. Rainwater or dew may be collected in waterproof material such as a poncho or tarp. It may be soaked up in cloth and wrung out. Shallow wells may be dug to collect rainfall and run-off. Water may be obtained from hollow trees, puddles, crevices, and leaves.
D. Water may be condensed from the steam of boiling seawater.
E. The basic water still will provide water in almost any environment. The water still can be in ground (a sheet of plastic, weighted in the center, spread over a hole in the ground, with a collection vessel underneath), above ground (a plastic bag filled with non-poisonous green vegetation and placed in the sun), or a transportation still (a plastic bag, tied over the end of a living, non-poisonous plant or tree branch). The in ground still is the best expedient way to purify water in a contaminated environment.
F. Muddy, stagnant, or polluted water should be made clear by filtration through layers of sand, gravel, and charcoal; or by settling prior to purification.
G. Water must be purified by boiling for 5-10 minutes; adding purification tablets per package instructions; adding 5-10 drops of 2% tincture of iodine per quart of water (let stand for 30 minutes); adding 5-10 drops of chlorine bleach per quart of water (let stand for 30 minutes); or using a portable purifier available commercially.
Survival Preparedness: Survival Skills & Survival Kits
1 comments Posted by Bushcraft and Survival SkillsSurvival Preparedness: Survival Skills & Survival Kits
Anyone can suddenly find themselves in an emergency survival situation, or have a disaster land in their lap without any warning. How well one survives or IF one survives at all could be a matter of luck, but as it has been said:
I think it is far better to invest some time and effort in making survival preparations as well as spending time honing your survival skills, don't you agree?
Survival preparedness does not mean to be in constant fear of impending doom or disaster waiting around every corner, or to stockpile huge amounts of food, water, lead, and gold and then waiting to bug out with your supplies to some remote location.
In a more realistic point of view, survival preparation is about gathering knowledge of and practicing the most basic survival skills, obtaining survival gear, food and water together into emergency survival kits, or bug out bags. These kits can then be placed at easily accessible places such as, the home, car, office, etc., or on your person.
You should always be thinking ahead to anticipate what sort of scenario could arise and what particular survival skills, gear, or supplies would be needed to survive through to the end such a scenario. I recommend you take a look at this list of basic survival skills and make an effort to learn and practice them, your life may depend on it!
- Learn how to build and maintain a fire with or without matches in different environments (in the rain, snow etc.)
- Learn how to build a simple survival shelter using only what is available in your surroundings
- Learn how to procure food (foraging, obtaining fish and game with out a gun or fishing pole)
- Learn basic navigation skills (finding your direction, and map and compass reading)
- Learn basic survival signaling methods
- Learn basic first-aid
- Learn to use and become proficient with the survival gear you have aquired
You should build your survival kit according to the scenario they should be used for.
Some examples:
- Wilderness survival kit should you become lost in the wilderness
- Emergency vehicle kit in the event you become stranded with your vehicle
- Emergency disaster kit to recover from the aftermath of a natural or man made disaster
Items that should always be included are:
- fire starting tools and methods
- items and knowledge to build an emergency / survival shelter
- survival tools
- first-aid kit
- survival signaling device
- emergency lighting
- water containers and methods of purification
- food rations
Remember in any survival situation to remain calm. Use your mind. It is the best survival tool you have.
Do yourself a huge favor and make the effort for your survival preparations toward your own survival and that of your loved ones. Don't wait. Do it NOW. Do not be the one suffering the consequences because you did not take any action at all.
Wilderness Survival Shelter Fire Water Hypothermia
0 comments Posted by Bushcraft and Survival SkillsPaul teaches on how to build a shelter, start a fire, melt snow, and signs of hypothermia. Shelter built with only a knife and fire started with a flint.
Bushcraft Survival Long Term Wilderness Shelter 7 Part Playlist
- Pt 1 making a bow-saw handle from hazel
- Pt 2 building a long term shelter
- Pt 3 building a long term shelter
- Pt 4 making a raised sack bed
- Pt 5 making a camp chair
- Pt 6 thatching the shelter with pine branches
- Pt 7 heating the shelter with hot stones
Bushcraft Survival Bug Out 5 Piece Kit
The first 5 items that I might include in an emergency bug out kit.
Bushcraft Knots Tutorial
A tutorial on knots that I use for bushcraft. I am not an expert really, I just use these knots a lot and this is my way of doing things. Do not use these knots for climbing or any other dangerous activities! Following knots are covered: - Clove hitch with slipped overhand knot (mastwurf mit slipstek) -Trucker's hitch (spanner mit slipstek) -Tautline hitch (stopper stek) -Bowline (palstek) -Butterfly (schmetterlingsknoten) -Sheet bend (schotstek) -? [a knot similar to siberian hitch] (anbindeknoten)
A requested topic from a viewer,, my preferred Top 10 items in my system..no snares, fishing gear as poaching will get you nicked...and as I stated the Leatherman was a "if I'm allowed a Luxury item" but I could just as easily included it in my First Aid kit as it would fit quite nicely in the large pouch so that was sneaked in with a wry smile....the Strikeforce is in my coat..always..and my EDC has another ferro rod too so again my grey lines overlap a lot...swings and roundabouts really ,,all this gear cost about the same as a Tom Brown Tracker..so I don't know..A super survival kit...does that count as one item?? A kukri comes with a small knife and a sharpener,,is that cheating.?.so the leatherman could have been in my first aid,, the strikeforce in my coat,, my EDC in my pocket...it could go on for ever really my knife cost £30 ,, a Trailmaster is £200..and those Crusader sets have five items and a pouch,, a Swiss Army stove,,is three items...a complete hammock set has a tarp,,mossy net and hammock and cost over £100...but as one item it would count....that's probably why I've not done a 10/5/20 item vid before ha ha!!
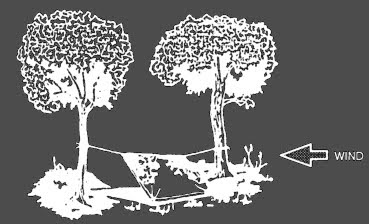
Survival Shelter Three-Pole Tarp Tepee
If you have a tarp and three poles and the situation allows, make a survival tarp tepee. It is easy and takes very little time to make this survival tepee. It provides protection from the elements and can act as a signaling device by enhancing a small amount of light from a fire or candle. It is large enough to hold several people and their equipment and to allow sleeping, cooking, and storing firewood.
You can make this tepee, you need three poles 3.5 to 4.5 meters long and about 5 centimeters in diameter.
To make this tepee (See Figure Below)--
- Lay the poles on the ground and lash them together at one end.
- Stand the framework up and spread the poles to form a tripod.
- For more support, place additional poles against the tripod. Five or six additional poles work best, but do not lash them to the tripod.
- Determine the wind direction and locate the entrance 90 degrees or more from the mean wind direction.
- Lay out the tarp on the "backside" of the tripod
- Place the tarp over the top of a free-standing pole.
- Then place the pole back up against the tripod so that the tarp is at the same height as the lashing on the three poles.
- Wrap the tarp around one side of the tripod.
- The canopy should be of double thickness, as you are wrapping an entire tarp.
- You need only wrap half of the tripod, as the remainder of the tarp will encircle the tripod in the opposite direction.
- Construct the entrance by wrapping the folded edges of the tarp around two free-standing poles.
- You can then place the poles side by side to close the tepee's entrance.
- Place all extra tarp underneath the tepee poles and inside to create a floor for the shelter.
- Leave a 30- to 50-centimeter opening at the top for ventilation if you intend to have a fire inside the tepee.

Another center support survival shelter is a Ponch Tent A-Frame set outside but over the center of the tent (Below). Use two 90- to 120-centimeter-long sticks, one with a forked end, to form the A-frame. Tie the hood's drawstring to the A-frame to support the center of the tent.

To make the poncho tent--
- Tie off the poncho hood in the same way as the poncho lean-to.
- Tie a 1.5- to 2.5-meter rope to the center grommet on each side of the poncho.
- Tie the other ends of these ropes at about knee height to two trees 2 to 3 meters apart and stretch the poncho tight.
- Draw one side of the poncho tight and secure it to the ground pushing sharpened sticks through the grommets.
- Follow the same procedure on the other side.
If you need a center support, use the same methods as for the poncho lean-to.

It takes only a short time and minimal equipment to build this lean-to (Below). You need a poncho, 2 to 3 meters of rope or parachute suspension line, three stakes about 30 centimeters long, and two trees or two poles 2 to 3 meters apart. Before selecting the trees you will use or the location of your poles, check the wind direction. Ensure that the back of your lean-to will be into the wind.
To make the lean-to--
- Tie off the hood of the poncho. Pull the drawstring tight, roll the hood longways, fold it into thirds, and tie it off with the drawstring.
- Cut the rope in half. On one long side of the poncho, tie half of the rope to the corner grommet. Tie the other half to the other corner grommet.
- Attach a drip stick (about a 10-centimeter stick) to each rope about 2.5 centimeters from the grommet. These drip sticks will keep rainwater from running down the ropes into the lean-to. Tying strings (about 10 centimeters long) to each grommet along the poncho's top edge will allow the water to run to and down the line without dripping into the shelter.
- Tie the ropes about waist high on the trees (uprights). Use a round turn and two half hitches with a quick-release knot.
- Spread the poncho and anchor it to the ground, putting sharpened sticks through the grommets and into the ground.
If you plan to use the lean-to for more than one night, or you expect rain, make a center support for the lean-to. Make this support with a line. Attach one end of the line to the poncho hood and the other end to an overhanging branch. Make sure there is no slack in the line.
Another method is to place a stick upright under the center of the lean-to. This method, however, will restrict your space and movements in the shelter.
For additional protection from wind and rain, place some brush, your rucksack, or other equipment at the sides of the lean-to.
To reduce heat loss to the ground, place some type of insulating material, such as leaves or pine needles, inside your lean-to.
Note:When at rest, you lose as much as 80 percent of your body heat to the ground.
To increase your security from enemy observation, lower the lean-to's silhouette by making two changes. First, secure the support lines to the trees at knee height (not at waist height) using two knee-high sticks in the two center grommets (sides of lean-to). Second, angle the poncho to the ground, securing it with sharpened sticks as above.
A shelter can protect you from the sun, insects, wind, rain, snow, hot or cold temperatures, and enemy observation. It can give you a feeling of well-being. It can help you maintain your will to survive.
In some areas, your need for shelter may take precedence over your need for food and possibly even your need for water. For example, prolonged exposure to cold can cause excessive fatigue and weakness (exhaustion). An exhausted person may develop a "passive" outlook, thereby losing the will to survive.
The most common error in making a shelter is to make it too large. A shelter must be large enough to protect you. It must also be small enough to contain your body heat, especially in cold climates.
SURVIVAL SHELTER SITE SELECTION
When you are in a survival situation and realize that shelter is a high priority, start looking for shelter as soon as possible. As you do so, remember what you will need at the site. Two requisites are--
- It must contain material to make the type of shelter you need.
- It must be large enough and level enough for you to lie down comfortably.
When you consider these requisites, however, you cannot ignore your tactical situation or your safety.
You must also consider whether the site--
- Provides concealment from enemy observation.
- Has camouflaged escape routes.
- Is suitable for signaling, if necessary.
- Provides protection against wild animals and rocks and dead trees that might fall.
- Is free from insects, reptiles, and poisonous plants.
You must also remember the problems that could arise in your environment. For instance--
- Avoid flash flood areas in foothills.
- Avoid avalanche or rockslide areas in mountainous terrain.
- Avoid sites near bodies of water that are below the high water mark.
In some areas, the season of the year has a strong bearing on the site you select. Ideal sites for a shelter differ in winter and summer. During cold winter months you will want a site that will protect you from the cold and wind, but will have a source of fuel and water. During summer months in the same area you will want a source of water, but you will want the site to be almost insect free.
When considering shelter site selection, use the word BLISS as a guide.
B- Blend in with the surroundings.
L- Low silhouette.
I - Irregular shape.
S- Small.
S- Secluded location.
When looking for a shelter site, keep in mind the type of shelter (protection) you need. However, you must also consider--
- How much time and effort you need to build the shelter.
- If the shelter will adequately protect you from the elements (sun, wind, rain,snow).
- If you have the tools to build it. If not, can you make improvised tools?
- If you have the type and amount of materials needed to build it.
To answer these questions, you need to know how to make various types of shelters and what materials you need to make them.
Youth instructor Ryan Douglas covers basic winter shelter concepts while building a quinzee snow shelter.
NOTE: I would not dismiss Ryan because he is young, it is very evident he knows exactly what he is talking about. He gives many related tips in surviving in a winter climate that could very well save your life!
Bushcraft Survival Basher Shelter And Resin Fire 2 Part Playlist
Seven Survival Shelters That Could Save your life!
0 comments Posted by Bushcraft and Survival SkillsSeven easily constructed Survival shelters which will save your life when needed.
Seven Primitive Survival Shelters That Could Save Your Life Quintze Hut Properly constructed, this poor man's igloo can be body-heated to above freezing on a 20-below day, higher if you light a candle. Step One Build up snow to a depth of at least 8 inches and pack it down to make a floor. Step Two Heap loose snow onto the floor. Piling the snow over a backpack or mound of branches will let you create a hollow, which hastens the excavation process, but it isn't necessary. Let the snow consolidate for an hour or more, until it is set up hard enough to form snowballs. Step Three Tunnel through....
 Subscribe